Device Command - for Muti-Devices
Nubis offers multiple ways to manage single or multiple devices effectively:
1. One-off control via Device Detail

2. Multiple devices control via Device Command

Multiple devices control via Device Command - Introduction by items
Deploy File
Traditionally, maintenance staff or system integrators had to physically visit the site to set up these files. Now, you can configure your files remotely.

Steps for Deploy File:
Select Date: Choose either "Immediately" or "Scheduling" to execute the deployment task. If scheduling, specify the desired date and time.
Select a File: Upload a file from your local PC or select a pre-uploaded file from Nubis Drive.
The “Auto-launch after deployment” option will activate for executable files (.exe or .msi for Windows, .apk for Android). Select this checkbox to launch the file automatically after deployment.Type Command for File Deployment (Optional): Enter custom commands provided by software developers to define specific deployment actions, such as silent installation.
File Stored Location (Optional): Specify the folder path on the terminal device where the file will be deployed. If the "config_install_apps" folder does not exist in the specified path, it will be created automatically.
- Default paths:
- Windows:
C:/users/public/downloads - Android:
Internal storage/downloads
- Windows:
- Default paths:
Confirm: Click the "Confirm" button to finalize and execute the deployment task.
Rotation
The software running in the terminal needs to match the correct screen orientation with the Windows system. Typically, kiosk software requires a portrait orientation, while checkout software uses landscape. The “Rotation” feature allows users to select the appropriate screen orientation for terminals. Four options are available: landscape, upside down, right, and left.

Steps for Rotation:
Select Date: Choose whether to execute the rotation task immediately or schedule it for a specific date and time.
Select an Orientation: Choose from one of the four screen orientation options: Landscape, Upside Down, Right, or Left, depending on the software requirements.
Confirm: Click the "Confirm" button to finalize and execute the rotation task.
Ora Update
 Typically, the Ora service will receive monthly updates to improve performance and fix bugs.
Restart the ora or restart the device.
Click the update button on the Ora interface in the device.

Use the "Update Ora" function in Nubis to manage updates. Follow the steps below for guidance.
Steps for using the "Update Ora" function in Nubis
Select Date:
- Choose between executing the task "Immediately" or scheduling it based on the "Device Updateable Time Period (Local Time)."
Confirm:
- Click the "Confirm" button to finalize and execute the Ora update task.
Grayscale Update
Grayscale update is similar to Ora updates. If you wish to update and test only a small number of devices for the new version, you can use grayscale updates.

Steps for Grayscale Update
- Select Date: Choose whether to execute the task immediately or schedule it according to the device's updateable time period (local time).
- Confirm: Click the "Confirm" button to finalize and initiate the Grayscale Update task.
Image Update

Image Grayscale Update

Kiosk Mode
Lock devices into a secure mode, hiding system UI and setting a default startup App.
For Windows systems, the Kiosk Mode will hide the start menu and notification, and the wallpaper will turn black. It will reboot the system automatically when users turn on/off the Kiosk Mode.
For Android systems, the Kiosk Mode will hide the navigation bar and notification bar.
This mode provides Kiosk devices a convenient method to set up. The option “Default startup App” is used to set a retail application as a default running App.
The App will keep operating no matter how many times the system restarts.

Steps for Configuring Kiosk Mode
- Select Date: Choose whether to execute the task immediately or schedule it for a specific future date.
- Kiosk Mode Switch: Enable or disable the Kiosk Mode.
- Type Command for Closing Your Application (Optional): Specify the application path for closing during Kiosk Mode.
Example:C:\Program Files\Google\Chrome\Application\chrome.exe.
(This is an example for "chrome.exe". Users must input the actual application path specific to their environment.) - Default Startup App: Set a default startup application for Kiosk Mode.
- For Windows Devices: Enter the path of the application.
- For Android Devices: Enter the package name (e.g.,
com.android.calculator2).
- Confirm: Click the "Confirm" button to send the task.
Restart System
In Nubis, the restart system function enables users to remotely reboot the system. In certain situations, users may need to immediately restart the devices to resolve hardware or software abnormalities.

Steps for Restart System
Select either execute the task immediately or set a future date.
(Optional) Type command for closing applications
This field allows users to insert the command to close the application before the system restart process.Click the confirm button to complete this task.
Screenshot
These features ensure users can effectively capture and manage real-time screenshots directly from their devices.
 Steps for Capturing and Managing Screenshots
- View Screenshots: Real-time screenshots from the device are displayed. Users can zoom in on the screenshots for a clearer view.
- Download All Screenshots: Use the batch-download button to download all available screenshots at once.
Application Running Status
Monitor which applications are actively running on a device or multiple devices.


Steps for Detecting Application Running Status
Select the "Application Running Status" Function
- This feature allows users to detect the running status of applications on one or multiple devices simultaneously.
Navigate to Device Details
- After initiating the detection for a device, navigate to the respective device by clicking its serial number (e.g., "demoandroid") in the device list.
Access the App Running Status Tab
- Within the device's detailed page, locate and select the "App Running Status" option from the Functional Sidebar.
Review the Detected Application Status
- The detected applications, their CPU usage, RAM usage, and an option to stop each application will be displayed. Users can view the details and take further actions based on the data.
Remote Desktop(VNC)
Access and control a device remotely for advanced troubleshooting (one device at a time).
- Requirements: The device must be online on Nubis platform to access it remotely.
- Feature Introduction: The VNC allows users to remotely control the device's desktop. No additional software installation is needed—you can manage the device directly through Nubis.
Steps:
- After selecting the "Remote Desktop" function, a pop-up window will appear asking for confirmation to perform the action. Click the Confirm Button.
Wait about 15 seconds for the device to connect. It will then redirect you to a new page in your browser, where you can start using the remote control function directly.

- When Nubis connects to the device, type the VNC password. Please contact Nubis sales to get the default password.

- Note: If your browser's default settings block popup windows, please click the icon to allow this permission for the first time.
- After accessing the device screen, users can remotely operate the device through Nubis.

Lock USB Drives
Block USB port functionality on Windows devices to prevent unauthorized access or malware threats.

Lock Combination Keys
Disable specific key combinations (e.g., Ctrl+Alt+Del) on Windows devices to prevent tampering.

Disable Windows Notify
Suppress all Windows notifications to avoid interruptions in kiosk or unattended environments.

Brightness
This function provides remote brightness adjustment capabilities, allowing users to manage device display settings without needing physical access.


Steps for Adjusting Brightness
Enable Brightness feature: Use the toggle switch to enable or disable the brightness control feature. Confirm the action by clicking the "Confirm" button.
Set Brightness Value: Adjust the brightness level by moving the slider, setting a value between 0 and 100, and then save the setting.
Volume
Control and set device audio levels remotely for consistent sound output.


Alert Setting
Apply templates for system alerts, notifying users of device conditions or events.


Steps for Applying or Removing Alert Templates
Apply Alert Template
- Select the "Apply Alert Template" option.
- Click "Select Alert Template" to open the template selection window.
- In the template list, check the desired template.
- Click "Confirm" to apply the selected template to the device(s).
Remove Alert Template
- Choose the "Remove all alert templates applied by this merchant" option (as shown in area 4).
- Click "Confirm" to remove all currently applied templates from the selected devices.
Note: This feature only works when the "Select All Devices" checkbox is enabled (see highlighted checkbox at the bottom of the screenshots).
Schedule Setting
Apply automation templates for tasks like powering on/off or other scheduled operations.


Steps for Applying or Removing a Schedule Template
Apply Schedule Template:
- Select "Apply Schedule Template" from the options.
- Ensure that a schedule template is created on the Schedule Management page before applying.
- The template allows configuration for scheduled tasks like Power On or Reboot.
Select Target Devices:
- Use the checkbox to select the devices or tags to apply the schedule template to.
Confirm Selection:
- After selecting the schedule template and devices, click "Confirm" to apply the settings.
Remove Schedule Templates:
- If needed, choose "Remove all schedule templates applied by this merchant" to clear existing schedules from all selected devices. This will stop monitoring and task execution.
Note: This feature only works when the "Select All Devices" checkbox is enabled (see highlighted checkbox at the bottom of the screenshots).
Related Articles
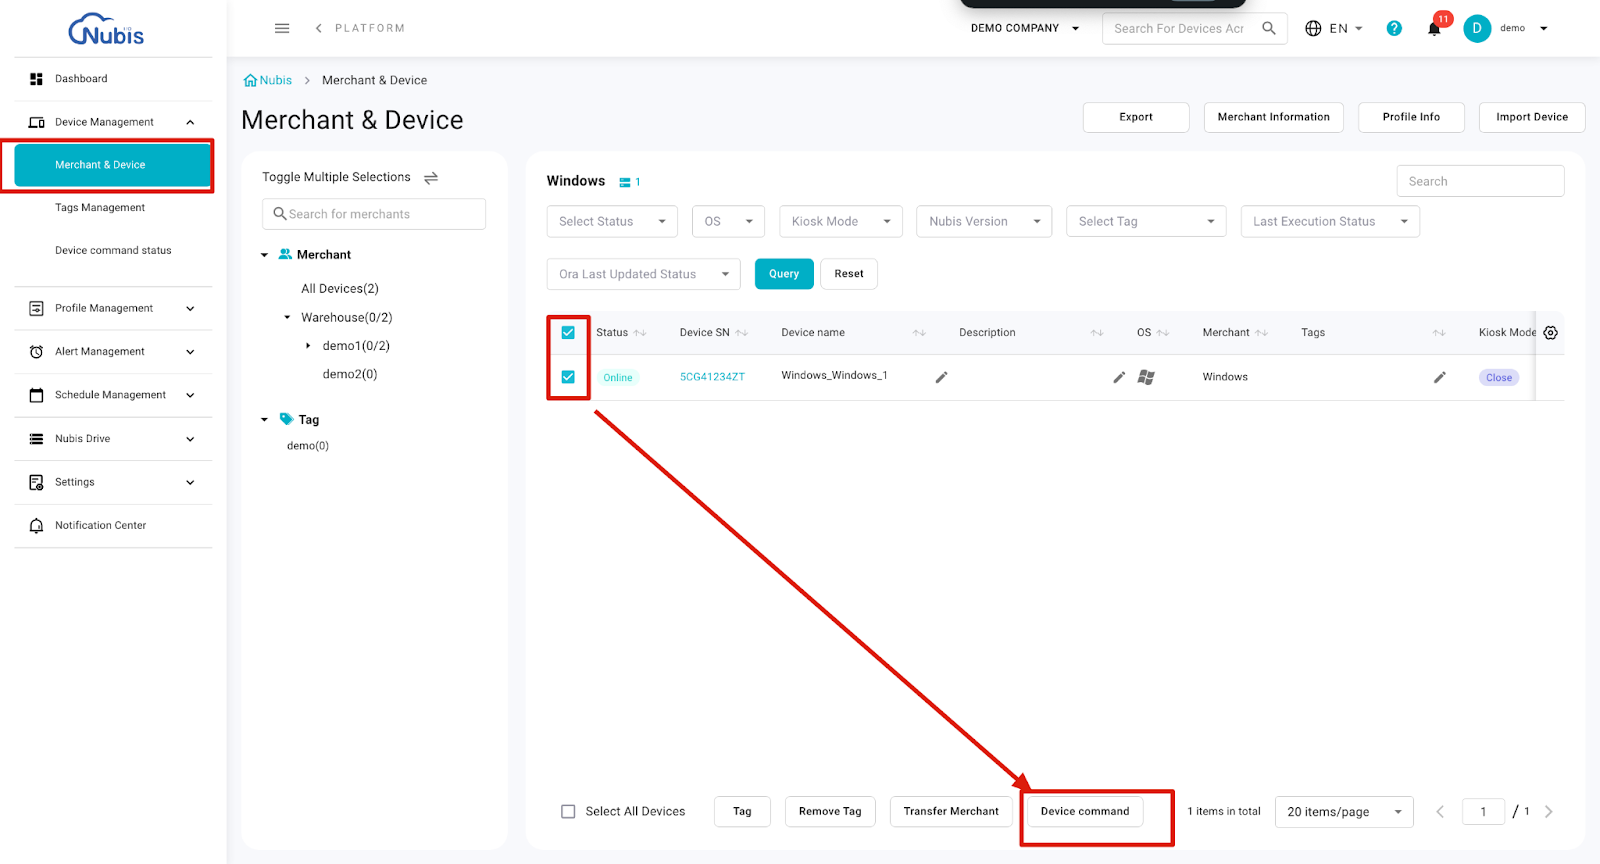
Overview - Multiple devices control via Device Command
Navigate to "Merchant & Device" > Select the devices by checking their checkboxes > Click "Device Command" to proceed. Overview - Configurations in Device Command Deploy File Rotation Ora Update Grayscale Update Image Update Image Grayscale Update ...Device Command Status
Overview The Device Command Status page provides a comprehensive overview of all commands executed across devices and merchants. Users can efficiently track, filter, and review the status of commands, ensuring seamless device management. With ...Enroll a Device(For Windows Devices)
Overview You’re using Nubis today probably because your organization needs to manage their devices at scale. To start using Nubis for device management, you’ll need to enroll your devices. You need to install Ora in all devices, so that Nubis can ...Enroll a Device(For Android Devices)
Overview You’re using Nubis today probably because your organization needs to manage their devices at scale. To start using Nubis for device management, you’ll need to enroll your devices. You need to install Ora in all devices, so that Nubis can ...Introduction of Merchant & Device
Overview The Merchant & Device page allows users to view, manage, and configure devices associated with merchants and tags. Here, features are divided into four key sections, as shown in the screenshot: 1. Merchant and Tag Selection Panel Merchant ...