Step 2: Device Management
Overview
How does device management happen in Nubis?
- Single device control via Device Detail
- Multiple devices control via Device Command
This guide will walk you through 1&2 !
Profiles for bulk settings - Apply configurations to one or more merchants, setting all devices under those merchants.
Single device control via Device Detail
To access device commands, navigate to the Merchant & Device Table and click on the Device SN. This will take you to Device Details, where you can find the Command section at the top right.


VNC
This function allows users to remotely control the device's desktop.
Click the VNC button and wait about 15 seconds for the device to connect. It will then redirect you to a new page in your browser, where you can start using the remote control function directly.
When Nubis connects to the device, type the VNC password. Please contact Nubis sales to get the default password.
Note: If your browser's default settings block popup windows, please click the icon to allow this permission for the first time.
Kiosk mode
For Windows systems, the Kiosk Mode will hide the start menu and notification, and the wallpaper will turn black. It will reboot the system automatically when users enable/disable the Kiosk Mode. For Android systems, the Kiosk Mode will hide the navigation bar and notification bar.
This mode provides Kiosk devices a convenient method to set up. The option “Default startup APP” is used to set a retail application as a default running APP. The APP will keep operating no matter how many times the system restarts.

Steps for setting Kiosk Mode:
Steps for setting Kiosk Mode:
Select either execute the task immediately or set a future date.
Turn on/off the Kiosk Mode.
Set an application to automatically run when Kiosk Mode is on. Enter the file location path of the application.
e.g. C:\Program Files\Google\Chrome\Application\chrome.exe
Rotation
The “Rotation” feature allows users to select the appropriate screen orientation for terminals. Four options are available: landscape, upside down, right, and left.
USB Connection
The USB connection provides users with information about USB devices that connect with the device. By clicking the “DETECT” button, users can get the port’s hardware location, description, and real-time status. For Windows systems, some USB devices that support drivers enable/disable can be set here.

Display Information
This section displays real-time information for the terminal device. By clicking the “DETECT” button, users can get the device name and resolution, including information for dual screens.
This feature also helps diagnose display issues by indicating abnormal hardware status.

APP Running Status
This function allows users to check the real-time status of all running applications. By clicking the “DETECT” button, users can get information about APP name, CPU usage, and RAM usage. Once found, any App causes high system resources.

Network Speed Test
Users can view their current network status by clicking the "Detect" button, which shows information such as download Mbps, upload Mbps, speed test date, and more. Users can also check the stability of their network and review the history of all previous network tests.

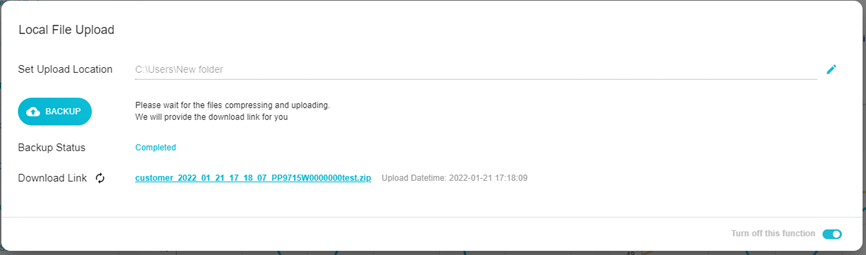
Local File Upload
The Local File Upload enables users to get the files they need from the terminal. First, enable this function by toggling the ON/OFF switch. Next, enter the folder path where you wish to receive the files. Finally, click the "CONFIRM" button to complete the setup for Local File Upload.

Once the above setup is complete, the BACKUP button will appear on the page. Click BACKUP to get the files from the set folder. The folder will be compressed and uploaded to Nubis Drive. When the compression and upload are finished, a download link will appear on this page. Click the link to download the file immediately.
 After the upload process is complete, users can also find the files in Nubis Drive for download. Navigate to the path: File Browser > Ora > zips > device’s S/N, then click the download button.
After the upload process is complete, users can also find the files in Nubis Drive for download. Navigate to the path: File Browser > Ora > zips > device’s S/N, then click the download button.
Multiple devices control through Device
Merchant & Device > Select the Devices / Click on "Select all Devices" > Device Command
On the Merchant & Device page, you can send commands to one or more devices.


Notes: The "Alert Setting" and "Schedule Setting" commands only work when the "Select All Devices" checkbox is selected.

Overview - Configurations in Device Command
- Deploy File
- Rotation
- Ora Update
- Grayscale Update
- Image Update
- Image Grayscale Update
- Kiosk Mode
- Restart System
- Screenshot
- Application Running Status
- Remote Desktop(VNC)
- Lock USB Drives
- Lock Combination Keys
- Disable Windows Notify
- Brightness
- Volume
- Alert Setting
- Schedule Setting
Related Articles
Step 3: Profile Management (For Android)
Create a Profile Template (for Android) Go to Profile Management > Profile List. Click the Create Profile button at the top right to create a new profile for Android from the dropdown menu. Profile Name Enter a template name. Profile Details Users ...Step 3: Profile Management (For Windows)
How does device management happen in Nubis? One-off control via Device Details Multiple device control via Device Commands Profiles for bulk settings - Apply configurations to one or more merchants, setting all devices under those merchants. This ...Step 1: Enroll a Device(For Android Devices)
Overview You’re using Nubis today probably because your organization needs to manage their devices at scale. To start using Nubis for device management, you’ll need to enroll your devices. You need to install Ora in all devices, so that Nubis can ...Step 1: Enroll a Device(For Windows Devices)
Overview You’re using Nubis today probably because your organization needs to manage their devices at scale. To start using Nubis for device management, you’ll need to enroll your devices. You need to install Ora in all devices, so that Nubis can ...